2022. 8. 5. 13:39ㆍSpring Boot
++) 해당 포스팅은 이전 게시글의 코드를 수정하여 진행하므로 먼저 보고 오는 것을 권장합니다.
https://born2bedeveloper.tistory.com/65
[Spring Boot] File Upload & Download (1)
이번 포스팅은 파일 업로드, 다운로드에 대한 간단한 예제를 만들어보려고 한다. DB없는 방식으로 만든 후, 이후에 Oracle과 연동하여 작성할것이다. 프로젝트 생성 - dependency 관리 먼저 선호하는
born2bedeveloper.tistory.com
이번에는 파일 업로드, 다운로드 로직에 Oracle DB를 연동하여 진행해볼 것이다.
JPA 방식을 사용하여 간단히 구현해보자.
Oracle & JPA dependency 및 환경 구성
build.gradle에 두 라이브러리를 추가한다.
build.gradle
implementation 'org.springframework.boot:spring-boot-starter-data-jpa'
implementation group: 'com.oracle.database.jdbc', name: 'ojdbc8', version: '21.6.0.0.1'
환경설정에 DB 커넥션 설정 및 JPA 설정을 추가하자.
application.yml
server:
  port: 8888
spring:
  servlet:
    multipart:
      enabled: true
      location: C:/Temp
      file-size-threshold: 2KB
      max-file-size: 200MB
      max-request-size: 215MB
  datasource:
    driver-class-name: oracle.jdbc.OracleDriver
    url: jdbc:oracle:thin:@localhost:1521:ORCL
    username: 유저 이름
    password: 비밀번호
  jpa:
    hibernate:
      ddl-auto: update
    show-sql: true
    database: oracle
file:
  uploadDir: ${user.home}/jimkwon
ddl-auto 설정을 통해 자동으로 테이블을 생성하게 설정해두자!
Entity 구현
테이블과 연동할 Entity를 구현하자.
domain/BaseEntity.java
import lombok.Getter;
import lombok.NoArgsConstructor;
import lombok.experimental.SuperBuilder;

import java.time.LocalDateTime;

import javax.persistence.Column;
import javax.persistence.EntityListeners;
import javax.persistence.MappedSuperclass;

import org.springframework.data.annotation.CreatedDate;
import org.springframework.data.annotation.LastModifiedDate;
import org.springframework.data.jpa.domain.support.AuditingEntityListener;

import com.fasterxml.jackson.annotation.JsonFormat;

import lombok.AccessLevel;

@Getter
@MappedSuperclass
@EntityListeners(AuditingEntityListener.class)
@NoArgsConstructor(access = AccessLevel.PROTECTED)
@SuperBuilder
public abstract class BaseEntity {

	@CreatedDate
	@Column(updatable = false)
	@JsonFormat(shape = JsonFormat.Shape.STRING, pattern = "yy-MM-dd", timezone = "Asia/Seoul")
	private LocalDateTime createdDate;

	@LastModifiedDate
	@JsonFormat(shape = JsonFormat.Shape.STRING, pattern = "yy-MM-dd", timezone = "Asia/Seoul")
	private LocalDateTime modifiedDate;

}
업로드한 파일의 생성 시간, 수정 시간은 BaseEntity를 따로 만들어 상속받는 구조로 만들었다.
수정, 생성시간을 갱신하기 위해 @EntityListeners를 넣어두고, FileApplication에 다음과 같이 JpaAuditing 어노테이션을 추가해준다.

domain/File.java
package com.example.file.domain;

import javax.persistence.*;
import lombok.AllArgsConstructor;
import lombok.Builder;
import lombok.Getter;
import lombok.NoArgsConstructor;
import lombok.ToString;

@Getter
@NoArgsConstructor
@AllArgsConstructor
@ToString
@Builder
@Entity
@Table(name="file_db")
public class File extends BaseEntity{

	@Id
	@GeneratedValue(strategy = GenerationType.AUTO)
	private Long id;

	@Column(name="FILE_NM")
	private String realName;

	@Column(name="FILE_TEMP_NM")
	private String uuidName;

	@Column(name="FILE_EXT")
	private String extension;

	@Column(name="FILE_PATH")
	private String filePath;

	@Column(name="FILE_SIZE")
	private long fileSize;


}
@Id 어노테이션을 사용할 때, 패키지 명을 주의하자.
org.springframework.data.annotation.Id 패키지는 no-sql일 경우이기 때문에
javax.persistence.Id 패키지를 import해야함
Repository 구현
import org.springframework.data.jpa.repository.JpaRepository;

import com.example.demo.domain.File;

public interface FileRepository extends JpaRepository<File, String>{
	File findByUuidName(String uuid);
}
필자의 경우, 파일 이름을 uuid로 변환하여 넣는 컬럼이 있기 떄문에 uuidName을 이용해 해당 파일을 불러오는 메소드를 하나 추가해두었다.
uuid : 어떤 개체(데이터)를 고유하게 식별하는 데 사용되는 16바이트(128비트) 길이의 숫자
사용하는 이유? 파일의 경우 이름이 중복될 경우가 있기 때문에 구분할 필요가 있다.
Service FileUpload 코드 수정
이제 기존의 코드에서 테이블에 파일의 메타데이터를 넣는 부분을 추가해보자.
먼저 repository를 주입한 후
FileService.java
@Service
@Slf4j
public class FileService {
	private final Environment env;
    private final Path fileLocation;
    private final FileRepository fileRepository;

    @Autowired
    public FileService(Environment env, FileRepository fileRepository) {
        this.env = env;
        this.fileLocation = Paths.get(env.getProperty("file.uploadDir")).toAbsolutePath().normalize();
        this.fileRepository = fileRepository;
        try {
            Files.createDirectories(this.fileLocation);
        } catch (Exception ex) {
            throw new FileStorageException("Could not create the directory where the uploaded files will be stored.", ex);
        }
    }
기존에 파일을 폴더에 업로드하는 메소드에 코드를 추가한다.
    public String storeFile(MultipartFile file) {
        String fileName = StringUtils.cleanPath(file.getOriginalFilename());

        try {
            if(fileName.contains("..")) {
                throw new FileStorageException("Sorry! Filename contains invalid path sequence " + fileName);
            }

            Path targetLocation = this.fileLocation.resolve(fileName);
            Files.copy(file.getInputStream(), targetLocation, StandardCopyOption.REPLACE_EXISTING);
            File fileEntity = File.builder()
                    .uuidName(UUID.randomUUID().toString())
                    .fileSize(file.getSize())
                    .filePath(targetLocation.toString())
                    .realName(FilenameUtils.removeExtension(fileName))
                    .extension(FilenameUtils.getExtension(fileName))
                    .build();

            fileRepository.save(fileEntity);
            return fileName;
        } catch (IOException ex) {
            throw new FileStorageException("Could not store file " + fileName + ". Please try again!", ex);
        }
    }
이제 DB연동 준비가 끝났다!
실행 결과
이제 변경된 코드를 실행하면 auto-ddl로 테이블이 자동 생성될것이다. 확인해보자.

터미널에 해당 문구가 뜨고, Oracle DB를 확인해보면

테이블이 자동 생성되었다! 이제 파일 업로드를 통해 데이터를 넣어보자.
그런데 띠용? 해당 오류가 뜬다.

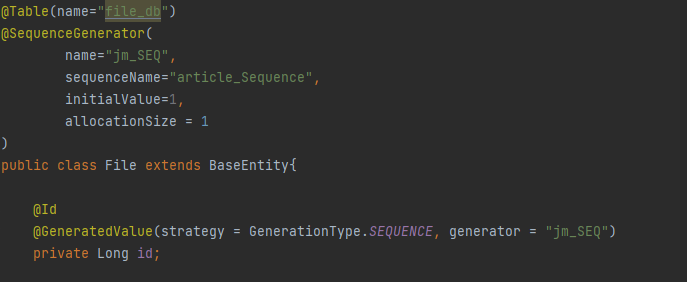
그 이유는 우리가 Entity에 지정해둔 기본키인 id에 대한 시퀀스가 존재하지 않는다는것..
기존에 늘 mysql로 Autoincrement로 자동증가를 해왔던 터라 Oracle의 시퀀스 문법에 익숙하지 않았다.
먼저, Oracle에서 시퀀스를 생성한다.
CREATE SEQUENCE JM_SEQ;
그 후 Entity를 수정해보자!

그 후 다시 어플리케이션을 기동하면?

야호! 이제 DB에 값이 들어갔나 확인해보자.

무사히 데이터가 들어간 것을 확인할 수 있다.
다양한 DB와 연동할 수 있으니 각자 환경에 맞춰서 설정할 수 있을 것이고, 업로드 이외에 넘어오는 인자값을 설정하여 DB에서 다양한 메타데이터를 꺼내올 수 있는 메소드를 만들 수 있을 것이다.
이후 응용은 필요한 상황에 따라 구현하면 되겠다.
파일 업로드, 다운로드 정복!
[참고 링크]
https://okky.kr/article/1211050
OKKY | springboot JPA 의 시퀀스가 생성 되지 않아요
oracle을 사용하고 있어서 pk를 시퀀스로 자동 생성을 하려고 했습니다. console을 보니까 시퀀스를 생성하지 않고 조회만 합니다. 당연히 시퀀스가 없다는 에러메시지만 뜨고 테스트 에러가 떴습니
okky.kr
'Spring Boot' 카테고리의 다른 글
| [Spring Boot] 이메일 보내기 (2) - 참조(cc), 첨부 파일 (8) | 2022.08.10 |
|---|---|
| [Spring Boot] SMS 전송 - NAVER SMS API 연동 (17) | 2022.08.10 |
| [Spring Boot] File Upload & Download (1) (2) | 2022.08.05 |
| [Spring Boot] Slack Bot을 생성하여 알림 보내기 (2) | 2022.02.21 |
| [Spring Boot] EMail 보내기 (4) | 2022.02.16 |